Wednesday, July 30, 2008

Work It Wednesday/Announcement

I'm not sure about you but I'm always looking for unique ways to make invitations. Store bought plain invitations are ok but since I'm a paper crafter, I really prefer to make my own and I like them to be unique. I saw this idea on a fellow blog (it wasn't for an ivitation) and knew I had to tweak it and make it my own, and then of course pass the idea along to you. So, for Work It Wednesday I present you with a fun invitation idea and at the same time I'm using it to really invite you to something....

if you actually had this in your hand, you'd now untie the
side bow and open it to read....


and with that, I make our fun announcement that we are
so excited to share....

We are thrilled to be hosting another crop and hope you'll come. Space filled up so quickly last time so don't wait to get your name on the list. And, if you have questions about it you can call the store (207) 889-8000 or email us at judysscrappin@yahoo.com.

And, finally, here are the steps to making your own TicTac invitation....


Tuesday, July 29, 2008

Quick Pick of the Day

I spotted these nesting punches on my last visit to the store. At first glance I just thought they were flower punches, and they are. However, these are what they call Nesting Punches. So, you can punch the three different sizes and then stack them together to make flowers with dimension. Very Cool. I don't have a sample of my own to show you but I did find the image below on the manufacture's website. Isn't this card cute? They've used these stamps and a combination of others to make a little flower garden. So fun.


P.S. Remember to tune in tomorrow for Work it Wednesday. I've got another fun little project to show and a big announcement to share. (No, Silly! Neither Judy or I are pregnant. It's not that kind of announcement)

Saturday, July 26, 2008

Speaking of...

So yesterday I showed a cute new bear stamp that the makers of House Mouse are starting to make. And, since I mentioned House Mouse I thought I'd send you all a happy House Mouse greeting for today....

Here's a smile to brighten your day and I hope you have a great weekend.
Smiles,
Amy

Friday, July 25, 2008

On Thursdays I have a little Craft Camp at my house. It consists of four to six little girls and we make crafts for 2 hours straight. Yesterday we made t-shirt pillows and hair barrettes. It was a lot of fun but boy oh boy was it messy! I let them use several of my stamps and once they were done creating and as I struggled to clean the stamps, I realized my job would be so much easier if I had these...

If you don't have any stamp cleaners on hand, I encourage you to get some and try them. They really do make the cleaning up process so much easier and it prolongs the life of your stamps too. And speaking of stamps, have you seen this?

The makers of the ever popular House Mouse line are now making bear items. We've already sold out of some of them as they are every bit as cute (maybe even cuter!) as the House Mouse stamps.

Wednesday, July 23, 2008

Work It Wednesday - Leaving your mark


Is it Wednesday already - Wow! This past week went really fast. Work it Wednesday started as a way to "work" our craft. Sometimes it's something fun, like using gum packaging to make a mini album and sometimes it's just a thought or idea. Today, it's the latter. I recently experienced something that made me think a little more about what I do and I've found a way to make it just a little better and I want to share. If nothing else, today's Work It Wednesday is something to think about. It's about leaving a mark on what you make.

My brother recent shared some old letters that he found. Letters written to him from me, my sister, and several letters from my mom. To understand where I'm going with this you need to know that my brother is quite a bit older than I am and he was pretty much out of the house by the time I was in Kindergarten. He left at the age of 19 to serve on a religious mission and then when he returned, 2 years later, he joined the National Guard. I really have no memory of this, I don't even remember what life was like at that time. Because of this these letters have became really valuable to me. The letters he shared were totally ordinary letters about everyday life at home.

As I read them, especially those written from my mom, I found myself trying to place when each letter was written on a mental time line. I kept thinking was this written before this or after this... I noticed in several of the letters a shift in perspective, mood, and message and I wondered why. Once I was able to locate the dates the letters were written it all made much more sense.

The thing is, we change over time. Not just in appearance or age but in the way we think and even in the way we create. I realize that not all my paper creations, mini albums and scrapbook layouts are going to last forever. But after reading these letters and questioning so many things about them, especially their date, I realized that the items that do last, need to be as complete as possible. Which means I need to leave my mark on them. I need to date them. This is something I haven't been very good at. Are you?

I am usually pretty good about recording the date that the photos were taken. However, I don't scrapbook chronologically so I might scrapbook something today that happened three or four years ago. My perspective, thought process, mood, etc... has since changed. Because of this, and after reading these letters, I am making more of an effort to record the date of the event and also the date the layout or mini album was completed. I'm leaving my mark and hopefully, years from now, my own daughters will look at what I've done and have all the pieces they need to understand the time line in which things were created.


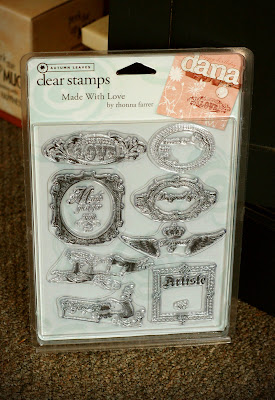
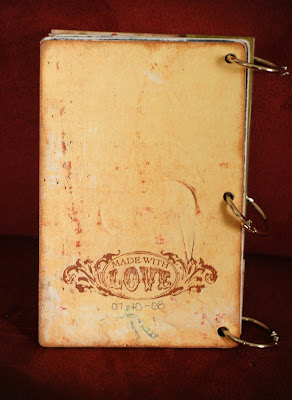
The photo at the top of the post shows how I've decided to leave my mark. I've picked a stamp I love (shown immediately above). This stamp will go on the back of all my creations along with the date. It's simple, it looks cool, and I've made my mark!

Think about it - how will you leave your mark on your own creations?
Enjoy!
Amy

P.S. The stamp set shown is available at Judy's. I had her special order it for me. As you can see it comes with several different styles that say different things like: Designed by, Created for, Artistic Creation #, and Made for. Not only is great for leaving your own make on layouts and mini albums but it works great for the back of cards too.

Tuesday, July 22, 2008

LOL!!!

When I was in the store last week I spotted these fun stamps and I laughed right out loud when I read them. Because they tickled my funny bone I thought they might yours as well. We can all use a good laugh today, right?


And then there are these:


You can click on the photo for a large view but in case you don't want to do that, here's what they say:

1- (green hair) - "I love giving homemade gifts.... pick a child."
2- (blue hair) - "who are these kids and why are they calling me mom?"
3- (red hair) - "put your big girl panties on and deal with it."

I laughed so hard at number 1 - maybe it was because I had my kids with me and we'd been in the car for two hours straight....

Saturday, July 19, 2008

Happy Saturday Morning!


Have you been out strawberry picking this year? I'm not sure but I think we are nearing the end of the season for fresh, farm picked strawberries in Maine. However, how fun would it be to create a layout about these delicious morsels. Either a layout about the family trip to pick them or maybe a recipe layout for your family cookbook. And speaking of strawberry recipes, here's one I found online that I'm going to try this weekend...... it looks so YUMMY!!!

For directions I will refer you to the site I found it at: Sycamore Stirrings

And if you'd like more recipe ideas on using Strawberries or other berries, Judy now has little pocket size recipe books that are filled with delicious recipes.

Enjoy,
Amy

P.S. - The papers shown above are no longer being made so if you like them, you might want to get them right away as we won't be able to restock them. And, if you can't make it into the store, remember Judy can ship them to you.

Friday, July 18, 2008

Check these out...


Aren't these just the cutest things ever? I was able to pop into the store yesterday and look what I found. Judy's been busy. She has made these cute little mini albums and they are ready and waiting for new homes. The coolest part of these little albums is that she's put the structure together for you. It includes chipboard covers, front and back, and blank cardstock pages. Some of which are tabbed. She's constructed the books for you and then you get to do all the fun stuff, like adding photos, journaling and other embellishments. Seriously! How cool is that?!

Wednesday, July 16, 2008

Work It Wednesday - Extra, Extra!

You all know that I'm big on taking something that is meant for one thing and using it for something else. Such is the case for today's post. It's just another idea that is inexpensive and pretty easy to do. And if you add in a little imagination you could convert this idea into many projects with different themes and purposes and that, if you ask me, is "extra" cool!

So, I ask you, have you looked at your gum packaging lately? If not, you may want to study it the next time you take out a piece of gum. Some of these little packages can make really cute little mini album holders. Here's how:

1- Very carefully take the package apart. Then using your paper of choice, trace the pattern of the package onto the paper and cut out.

* if the paper you are using is thin, you may want to glue it directly to the box. I used a thick, double sided paper so after I traced it and cut it out, the thick paper stood on it's own.


2- Set the packaging on top of the cut out paper. Using the folds on the packaging as your guide, fold your paper into shape. (see visual below)

3 - Once folds have been made, glue your little box together. Be sure to cut out any openings that are on the original packaging before you add adhesive. (see visual below)


4 - Fill it up with something fun. You could add gift cards, personal notes, tickets or even turn it into a little mini scrapbook. I added 4 little mini-layouts inside of my decorative package and turned it into a quick keepsake that my mother-in-law can keep in her purse as a little brag book.

So there you have it. I hope you have an "extra" good day Wednesday!
Enjoy!
Amy

Tuesday, July 15, 2008

Product Pick


Oh My!!! I have a weakness for inexpensive, adorable things. And, if these new stamps aren't adorable than I'm not sure what is. Seriously, aren't these cute and they are a $1!!!

I can't wait to make a card with the bunny in the middle. If you can't read it, it says "Today I caught myself smiling then I realized .... I was thinking of you!" Awe!!!

And the cool thing about these stamps is that all the pieces are separate so you can mix and match designs which gives you tons of options to work with.

Enjoy!

P.S. Work it Wednesday tomorrow will be "extra" special! Stay tuned....

Friday, July 11, 2008

We're So Excited!!!


We've had good news today and want to share. Judy's grand kids are famous! You might remember this little album from a past post but it was published recently and the idea book it is in has just hit the news stands.

And, for those that attended our last crop, this book might look a little familiar to you too. This was the inspiration album for our mini album we made in class. The one we made was slightly different and looks like the one below. Remember? It's fun to take an idea and re-use it with a new theme and purpose.


Both of the mini albums, the one with Judy's grandkids and the one from the crop, were both made using these Kaiser Board Books - we've got some in stock now and would love for you to stop in and check them out.


And, if you are interested in making a book like these but need some help, please inquire about kits and classes.

Smiles,
Amy

Wednesday, July 9, 2008

Work It Wednesday - Kiss and Tell

Did the title of this blog post catch your eye? Ya, well I don't have anything steamy to report, I just have a cool little stamping technique to tell you about that's called "kissing".

"Kissing" is where you ink up one stamp and then take another stamp and "kiss" it to the inked stamp. Then, using the stamp that you just "kissed" with, you stamp onto your paper. It's hard to explain but easy to show, here's how you do it....


1- Gather your supplies. You need at least two stamps. One with some details like the acrylic flower shown and one that is mostly a solid surface like the circle stamp shown. Plus, don't forget your ink and paper too.

2- Using the detailed stamp you choose, ink it up

3- Then, using the solid stamp press it onto of the previously inked stamp. In a sense you are kissing the two stamps together - be sure to keep the stamps steady and flat.

4- Remove the solid stamp (a circle for me) and stamp it onto your paper.

There you have it, you're done. This is really fun to experiment with. It can work with so many different kinds of stamps and designs and will allow you more options in your paper crafting.


I liked my little flower circles so much that I decided to stamp a whole bunch of them in different colors and use them on a card. I grabbed some other supplies that I found at Judy's (LOVE, LOVE, LOVE - the giant die cut flower and the ribbon stickers too) and I quickly whipped this up.


Also, awhile back I created a layout using the same technique, it's not exactly the right season for today's post but it shows another idea on how to use this technique. I made the pumpkins and the "U" and "R" by kissing stamps together.

So there you have it, give "kissing" a try, be creative and hopefully have a great day.

Enjoy,
Amy

Monday, July 7, 2008

Binder Rings


I don't know about you but most of the mini-albums I make are held together with binder rings. I like binder rings because they are easy to add or subtract pages from. Not to mention they are just simply, easy to use. One thing I don't always care for is that I've had a hard time finding binding rings that aren't the bright, traditional silver. That is until now. Several different companies are making binder rings now, including these by 7-gypsies. We have them in black and a brush nickel - both are awesome and would be perfect for almost any project. Stop in and check them out.

Amy

Wednesday, July 2, 2008

Work It Wednesday - July 2nd


Today's Work it Wednesday post is another post about what you can do with your paper crafting supplies. It's mostly for fun especially since we have a holiday coming up. And, just for the record, I can take no credit for this idea. It's one I saw on another blog and wanted to try myself. So, without further delay here's a quick little step-by-step guide for turning a role of Life-savers into a firecracker.


1 - With a sharp tool, poke a large hole in both ends of the Life-saver package. Set Life-savers aside for a moment.

2- Cut a long string of wire and fold it three or four times as shown above. Set aside.

3- Using scrapbook paper and embellishments, cover and decorate Life-saver roll.

4- Thread wire bundle through the holes you poked in step 1. Be sure to have more wire on the top and as shown in photo above.

5 & 6 - Turn Life-saver over and press wire ends flat. This will secure the wire into place. If needed you can hold the wire into place with a little tape or glue dot.

7 - (not shown) Using a star punch, punch out and adhere stars to the tops of the wire. I placed a star in place using a glue dot and then put another star behind it. This sandwiched the wire and adhesive in between the two stars.

8 - Give some one you love your firecracker creation and wish them a Happy 4th of July.

So, there you have it! It's easy, it's quick, it's edible and it's one more way to work your love of paper crafting into your everyday life.
Enjoy!
Amy

Tuesday, July 1, 2008

Birthdays


Today my first born turns 11. Needless to say today will be filled with happiness as we celebrate her day. In keeping with the birthday theme, here are a few product picks that you may not have realized that Judy's sells.

1 - Decorative Tape: Seriously, how cute is this? You could use it to wrap presents or use it as decoration on a scrapbook layout or birthday card.

2- Candles: On more than one occasion we've had people come in looking for birthday candles. Because of this we've started carrying them.

3- Birthday Calendars: I've posted about these before, but we have different kinds of calendars on hand, one of them being a special occasion book that you can decorate and keep close at hand so you remember all those important events, including birthdays, in your life.

4- Balloons: I don't have a picture of balloons, but in case you didn't know Judy carries helium balloons too.

5- Birthday themed stickers and such: And last but not least, we of course have all kinds of birthday papers, birthday stickers and embellishments to match. With the birthday themed paper craft products we have in stock you can make all sorts of layouts and cards celebrating your family and friends birthdays!


Enjoy!
Amy

P.S. Happy Birthday Turkey!